
Ho acquistato da poco un display TFT 1,8″ ed h voluto provarlo con l’arduino Leonardo.

Questo modello di display tft usa un ST7735 come driver di controllo ed ha una risolizione di 128×160 pixel ed è compatibile sia con Arduino sia con Raspberry Pi.
In questo articolo la vedrai collegata ad una Arduino Leonardo.
Caratteristiche del display TFT 1,8″
alcune delle caratteristiche di questo display le hai già lette nel paragrafo principale:
| Driver | ST7735 |
| Risoluzione | 128×160 |
| Dimensioni | 1,8″ |
| Interfaccia | SPI |
| Opzioni | SD Card reader |
si è presente anche un lettore di SD Card che puoi usare sia per caricare immagini da visualizzare sul display sia per salvare informazioni del tuo progetto.
Le connessioni al display sono:
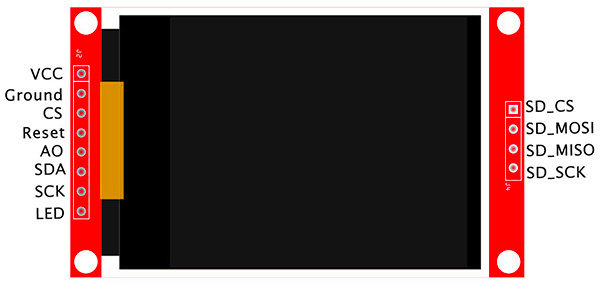
sul lato sinistro ci sono i collegamenti per il controllo del display SPI e l’alimentazione del dispay a cui l’unica attenzione che devi portare è l’utilizzo dei 3,3v che alimentano la retroilluminazione a LED e vanno connessi a al pin denominato LED.
Sulla parte destra del display TFT 1,8″ trovi i collegamenti al lettore di SD Card posto sul retro del display:
![]()
Collegamento del display ST7735
Il produttore del display ha rilasciato lo schema dei collegamento da seguire:
![]()
in cui noti che tutti i segnali di controllo passano da uno shift level a 3,3v per evitare di danneggiare il componente e la sola alimentazione a 3,3v è direttamente connessa al corrispondente pin arduino.
Warning!
nel mio test non ho utilizzato lo shift level, in quanto non ne avevo uno a mia disposizione e il risultato è che per pochi secondi il display funziona senza danneggiarsi, tuttavia è necessario avere uno shift level se utilizzi il display in un progetto.Ecco come ho collegato il display alla arduino leonardo:
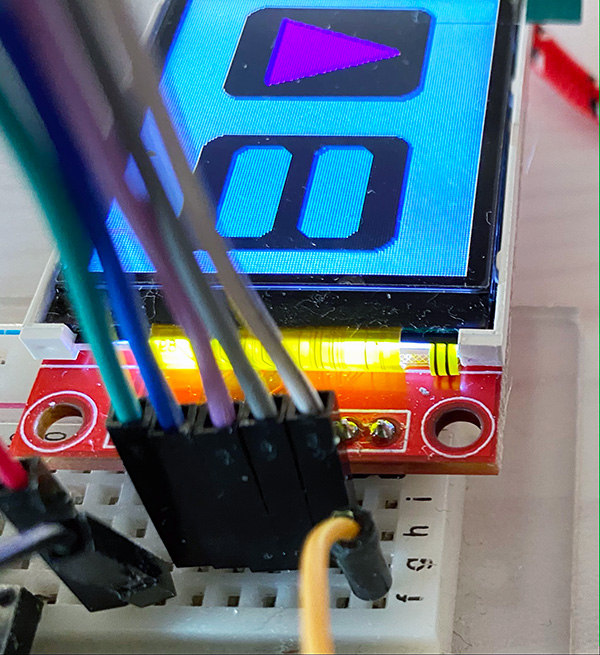
e lato arduino:
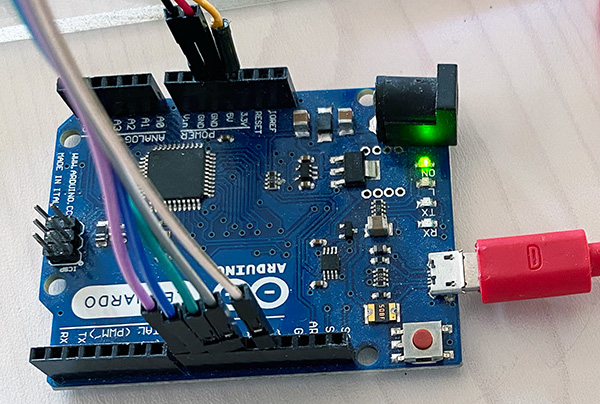
seguendo i colori dei fili vedrai che i collegamenti seguono il seguente schema:
| Arduino Leonardo | Display ST7735 TFT 1,8″ |
| 5v | VCC |
| Gnd | Gnd |
| 10 | CS |
| 9 | Reset |
| 8 | A0 |
| 11 | SDA |
| 13 | SCK |
| 3,3v | LED |
le connessioni ti serviranno per impostare lo sketch.
In questo primo esperimento la parte SD Card è scollegata perché non la userai.
Sketch di controllo del display TFT 1,8″
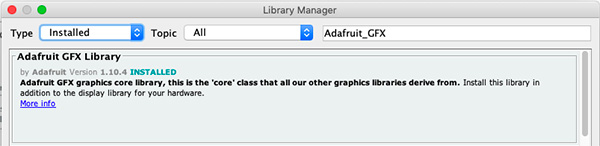
Per utilizzare il display scegli la libreria Adafruit ST7735:
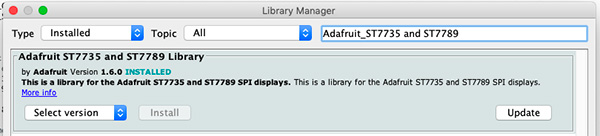
che richiede l’installazione anche della libreria Adafruit GFX:
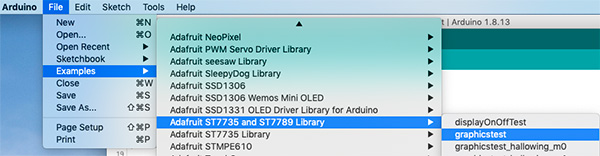
e per il test puoi usare uno degli esempi “graphicstest”:
 e ti troverai il seguente sketch:
/***************************************************
  This is a library for the Adafruit 1.8" SPI display.

This library works with the Adafruit 1.8" TFT Breakout w/SD card
  ----> http://www.adafruit.com/products/358
The 1.8" TFT shield
  ----> https://www.adafruit.com/product/802
The 1.44" TFT breakout
  ----> https://www.adafruit.com/product/2088
as well as Adafruit raw 1.8" TFT display
  ----> http://www.adafruit.com/products/618

  Check out the links above for our tutorials and wiring diagrams
  These displays use SPI to communicate, 4 or 5 pins are required to
  interface (RST is optional)
  Adafruit invests time and resources providing this open source code,
  please support Adafruit and open-source hardware by purchasing
  products from Adafruit!

  Written by Limor Fried/Ladyada for Adafruit Industries.
  MIT license, all text above must be included in any redistribution
 ****************************************************/

#include <Adafruit_GFX.h>    // Core graphics library
#include <Adafruit_ST7735.h> // Hardware-specific library
#include <SPI.h>


// For the breakout, you can use any 2 or 3 pins
// These pins will also work for the 1.8" TFT shield
#define TFT_CS     10
#define TFT_RST    9  // you can also connect this to the Arduino reset
                      // in which case, set this #define pin to 0!
#define TFT_DC     8

// Option 1 (recommended): must use the hardware SPI pins
// (for UNO thats sclk = 13 and sid = 11) and pin 10 must be
// an output. This is much faster - also required if you want
// to use the microSD card (see the image drawing example)
// Adafruit_ST7735 tft = Adafruit_ST7735(TFT_CS,  TFT_DC, TFT_RST);

// Option 2: use any pins but a little slower!
#define TFT_SCLK 13   // set these to be whatever pins you like!
#define TFT_MOSI 11   // set these to be whatever pins you like!
Adafruit_ST7735 tft = Adafruit_ST7735(TFT_CS, TFT_DC, TFT_MOSI, TFT_SCLK, TFT_RST);


float p = 3.1415926;

void setup(void) {
  Serial.begin(115200);
  Serial.print("Hello! ST7735 TFT Test");

  // Use this initializer if you're using a 1.8" TFT
  tft.initR(INITR_BLACKTAB);   // initialize a ST7735S chip, black tab

  // Use this initializer (uncomment) if you're using a 1.44" TFT
  //tft.initR(INITR_144GREENTAB);   // initialize a ST7735S chip, black tab

  Serial.println("Initialized");

  uint16_t time = millis();
  tft.fillScreen(ST7735_BLACK);
  time = millis() - time;

  Serial.println(time, DEC);
  delay(500);

  // large block of text
  tft.fillScreen(ST7735_BLACK);
  testdrawtext("Lorem ipsum dolor sit amet, consectetur adipiscing elit. Curabitur adipiscing ante sed nibh tincidunt feugiat. Maecenas enim massa, fringilla sed malesuada et, malesuada sit amet turpis. Sed porttitor neque ut ante pretium vitae malesuada nunc bibendum. Nullam aliquet ultrices massa eu hendrerit. Ut sed nisi lorem. In vestibulum purus a tortor imperdiet posuere. ", ST7735_WHITE);
  delay(1000);

  // tft print function!
  tftPrintTest();
  delay(4000);

  // a single pixel
  tft.drawPixel(tft.width()/2, tft.height()/2, ST7735_GREEN);
  delay(500);

  // line draw test
  testlines(ST7735_YELLOW);
  delay(500);

  // optimized lines
  testfastlines(ST7735_RED, ST7735_BLUE);
  delay(500);

  testdrawrects(ST7735_GREEN);
  delay(500);

  testfillrects(ST7735_YELLOW, ST7735_MAGENTA);
  delay(500);

  tft.fillScreen(ST7735_BLACK);
  testfillcircles(10, ST7735_BLUE);
  testdrawcircles(10, ST7735_WHITE);
  delay(500);

  testroundrects();
  delay(500);

  testtriangles();
  delay(500);

  mediabuttons();
  delay(500);

  Serial.println("done");
  delay(1000);
}

void loop() {
  tft.invertDisplay(true);
  delay(500);
  tft.invertDisplay(false);
  delay(500);
}

void testlines(uint16_t color) {
  tft.fillScreen(ST7735_BLACK);
  for (int16_t x=0; x < tft.width(); x+=6) {
    tft.drawLine(0, 0, x, tft.height()-1, color);
  }
  for (int16_t y=0; y < tft.height(); y+=6) {
    tft.drawLine(0, 0, tft.width()-1, y, color);
  }

  tft.fillScreen(ST7735_BLACK);
  for (int16_t x=0; x < tft.width(); x+=6) {
    tft.drawLine(tft.width()-1, 0, x, tft.height()-1, color);
  }
  for (int16_t y=0; y < tft.height(); y+=6) {
    tft.drawLine(tft.width()-1, 0, 0, y, color);
  }

  tft.fillScreen(ST7735_BLACK);
  for (int16_t x=0; x < tft.width(); x+=6) {
    tft.drawLine(0, tft.height()-1, x, 0, color);
  }
  for (int16_t y=0; y < tft.height(); y+=6) {
    tft.drawLine(0, tft.height()-1, tft.width()-1, y, color);
  }

  tft.fillScreen(ST7735_BLACK);
  for (int16_t x=0; x < tft.width(); x+=6) {
    tft.drawLine(tft.width()-1, tft.height()-1, x, 0, color);
  }
  for (int16_t y=0; y < tft.height(); y+=6) {
    tft.drawLine(tft.width()-1, tft.height()-1, 0, y, color);
  }
}

void testdrawtext(char *text, uint16_t color) {
  tft.setCursor(0, 0);
  tft.setTextColor(color);
  tft.setTextWrap(true);
  tft.print(text);
}

void testfastlines(uint16_t color1, uint16_t color2) {
  tft.fillScreen(ST7735_BLACK);
  for (int16_t y=0; y < tft.height(); y+=5) {
    tft.drawFastHLine(0, y, tft.width(), color1);
  }
  for (int16_t x=0; x < tft.width(); x+=5) {
    tft.drawFastVLine(x, 0, tft.height(), color2);
  }
}

void testdrawrects(uint16_t color) {
  tft.fillScreen(ST7735_BLACK);
  for (int16_t x=0; x < tft.width(); x+=6) {
    tft.drawRect(tft.width()/2 -x/2, tft.height()/2 -x/2 , x, x, color);
  }
}

void testfillrects(uint16_t color1, uint16_t color2) {
  tft.fillScreen(ST7735_BLACK);
  for (int16_t x=tft.width()-1; x > 6; x-=6) {
    tft.fillRect(tft.width()/2 -x/2, tft.height()/2 -x/2 , x, x, color1);
    tft.drawRect(tft.width()/2 -x/2, tft.height()/2 -x/2 , x, x, color2);
  }
}

void testfillcircles(uint8_t radius, uint16_t color) {
  for (int16_t x=radius; x < tft.width(); x+=radius*2) {
    for (int16_t y=radius; y < tft.height(); y+=radius*2) {
      tft.fillCircle(x, y, radius, color);
    }
  }
}

void testdrawcircles(uint8_t radius, uint16_t color) {
  for (int16_t x=0; x < tft.width()+radius; x+=radius*2) {
    for (int16_t y=0; y < tft.height()+radius; y+=radius*2) {
      tft.drawCircle(x, y, radius, color);
    }
  }
}

void testtriangles() {
  tft.fillScreen(ST7735_BLACK);
  int color = 0xF800;
  int t;
  int w = tft.width()/2;
  int x = tft.height()-1;
  int y = 0;
  int z = tft.width();
  for(t = 0 ; t <= 15; t++) {
    tft.drawTriangle(w, y, y, x, z, x, color);
    x-=4;
    y+=4;
    z-=4;
    color+=100;
  }
}

void testroundrects() {
  tft.fillScreen(ST7735_BLACK);
  int color = 100;
  int i;
  int t;
  for(t = 0 ; t <= 4; t+=1) {
    int x = 0;
    int y = 0;
    int w = tft.width()-2;
    int h = tft.height()-2;
    for(i = 0 ; i <= 16; i+=1) {
      tft.drawRoundRect(x, y, w, h, 5, color);
      x+=2;
      y+=3;
      w-=4;
      h-=6;
      color+=1100;
    }
    color+=100;
  }
}

void tftPrintTest() {
  tft.setTextWrap(false);
  tft.fillScreen(ST7735_BLACK);
  tft.setCursor(0, 30);
  tft.setTextColor(ST7735_RED);
  tft.setTextSize(1);
  tft.println("Hello World!");
  tft.setTextColor(ST7735_YELLOW);
  tft.setTextSize(2);
  tft.println("Hello World!");
  tft.setTextColor(ST7735_GREEN);
  tft.setTextSize(3);
  tft.println("Hello World!");
  tft.setTextColor(ST7735_BLUE);
  tft.setTextSize(4);
  tft.print(1234.567);
  delay(1500);
  tft.setCursor(0, 0);
  tft.fillScreen(ST7735_BLACK);
  tft.setTextColor(ST7735_WHITE);
  tft.setTextSize(0);
  tft.println("Hello World!");
  tft.setTextSize(1);
  tft.setTextColor(ST7735_GREEN);
  tft.print(p, 6);
  tft.println(" Want pi?");
  tft.println(" ");
  tft.print(8675309, HEX); // print 8,675,309 out in HEX!
  tft.println(" Print HEX!");
  tft.println(" ");
  tft.setTextColor(ST7735_WHITE);
  tft.println("Sketch has been");
  tft.println("running for: ");
  tft.setTextColor(ST7735_MAGENTA);
  tft.print(millis() / 1000);
  tft.setTextColor(ST7735_WHITE);
  tft.print(" seconds.");
}

void mediabuttons() {
  // play
  tft.fillScreen(ST7735_BLACK);
  tft.fillRoundRect(25, 10, 78, 60, 8, ST7735_WHITE);
  tft.fillTriangle(42, 20, 42, 60, 90, 40, ST7735_RED);
  delay(500);
  // pause
  tft.fillRoundRect(25, 90, 78, 60, 8, ST7735_WHITE);
  tft.fillRoundRect(39, 98, 20, 45, 5, ST7735_GREEN);
  tft.fillRoundRect(69, 98, 20, 45, 5, ST7735_GREEN);
  delay(500);
  // play color
  tft.fillTriangle(42, 20, 42, 60, 90, 40, ST7735_BLUE);
  delay(50);
  // pause color
  tft.fillRoundRect(39, 98, 20, 45, 5, ST7735_RED);
  tft.fillRoundRect(69, 98, 20, 45, 5, ST7735_RED);
  // play color
  tft.fillTriangle(42, 20, 42, 60, 90, 40, ST7735_GREEN);
}
Personalizzazione delo sketch
Lo sketch originale, presente nell’esempio, necessita di una personalizzazione:
// For the breakout, you can use any 2 or 3 pins
// These pins will also work for the 1.8" TFT shield
#define TFT_CS     10
#define TFT_RST    9  // you can also connect this to the Arduino reset
                      // in which case, set this #define pin to 0!
#define TFT_DC     8

// Option 1 (recommended): must use the hardware SPI pins
// (for UNO thats sclk = 13 and sid = 11) and pin 10 must be
// an output. This is much faster - also required if you want
// to use the microSD card (see the image drawing example)
// Adafruit_ST7735 tft = Adafruit_ST7735(TFT_CS,  TFT_DC, TFT_RST);

// Option 2: use any pins but a little slower!
#define TFT_SCLK 13   // set these to be whatever pins you like!
#define TFT_MOSI 11   // set these to be whatever pins you like!
Adafruit_ST7735 tft = Adafruit_ST7735(TFT_CS, TFT_DC, TFT_MOSI, TFT_SCLK, TFT_RST);
le linee 29-45 contengono delle linee su cui devi intervenire per adattare lo sketch allo schema utilizzato, in particolare:
linee 31-34: imposta correttamente i valori dei pin CS=10, RST_9 e DC=8;
linea 40: commenta, aggiungendo il doppio slash all’inizio, questa inizializzazione in quanto useremo l’opzione 2;
linee 43-44: imposta SCLK=13 e MOSI=11;
linea 45: togli il commento a questa linea per indicare alla libreria di utilizzare questi due pin rispettivamente come SCLK e MOSI in quanto l’Arduino Leonardo non presenta sui pin 13 e 11 le funzioni che ti servono per controllare il display TFT 1,8″;
Grazie a questa possibilità potrai utilizzare questo display anche con micro controllori che non presentano in modo nativo i segnali MOSI e SCK, la libreria provvederà a simulare i segnali.
Ovviamente il display risponderà leggermente più lentamente dovendo simulare i segnali e non potendo utilizzare il segnale hardware nativo del micro controllore per tali pin.

 Il blog mauroalfieri.it ed i suoi contenuti sono distribuiti con Licenza